Cloud-Init Ubuntu VM Installation
Proxmox VM setup
Table of contents
- Background: Cloud-Init Server install using tteck’s Proxmox VE Helper script
- Run tteck’s Ubuntu 24.04 installation script
- Fill in Cloud-Init Data
- Resize the bootdisk
(/dev/sda) - Expand the VM disk partition to use the new space
- Enable SSH
- Add QEMU Guest Agent
- Install files required for iGPU hardware passthrough
- Next Step: GPU Hardware Passthrough
Background: Cloud-Init Server install using tteck’s Proxmox VE Helper script
I have found tteck’s Cloud-Init server installation method to be much faster than doing a manual Ubuntu installation. The only “gotcha” is in the warning below!
For iGPU passthrough, the required files in
linux-genericare NOT part of the Ubuntu Cloud-Init distribution used by the tteck Ubuntu installation script.That means we have to remember to load them using
sudo apt install sudo linux-genericafter starting the VM for the first time. So follow these instructions to the end of this page!
Do
Run tteck’s Ubuntu 24.04 installation script
We are going to run tteck’s Ubuntu 24.04 script found at https://community-scripts.github.io/ProxmoxVE/scripts?id=ubuntu2404-vm
Run tteck scripts from the Proxmox GUI shell, not SSH!
bash -c "$(wget -qLO - https://github.com/community-scripts/ProxmoxVE/raw/main/vm/ubuntu2404-vm.sh)"
DO NOT START the VM until after you do the following Cloud-Init setup steps below! ⬇
Fill in Cloud-Init Data
In the steps below, we are going to follow most of tteck’s detailed Cloud-Init setup instructions at https://github.com/community-scripts/ProxmoxVE/discussions/272.
If you prefer to use tteck’s steps above, STOP at the “Install Docker” step.
We will install Docker later using Anand’s excellent SimpleHomelab Deployarr application.
Click on Cloud-Init in the VM’s vertical middle menu bar
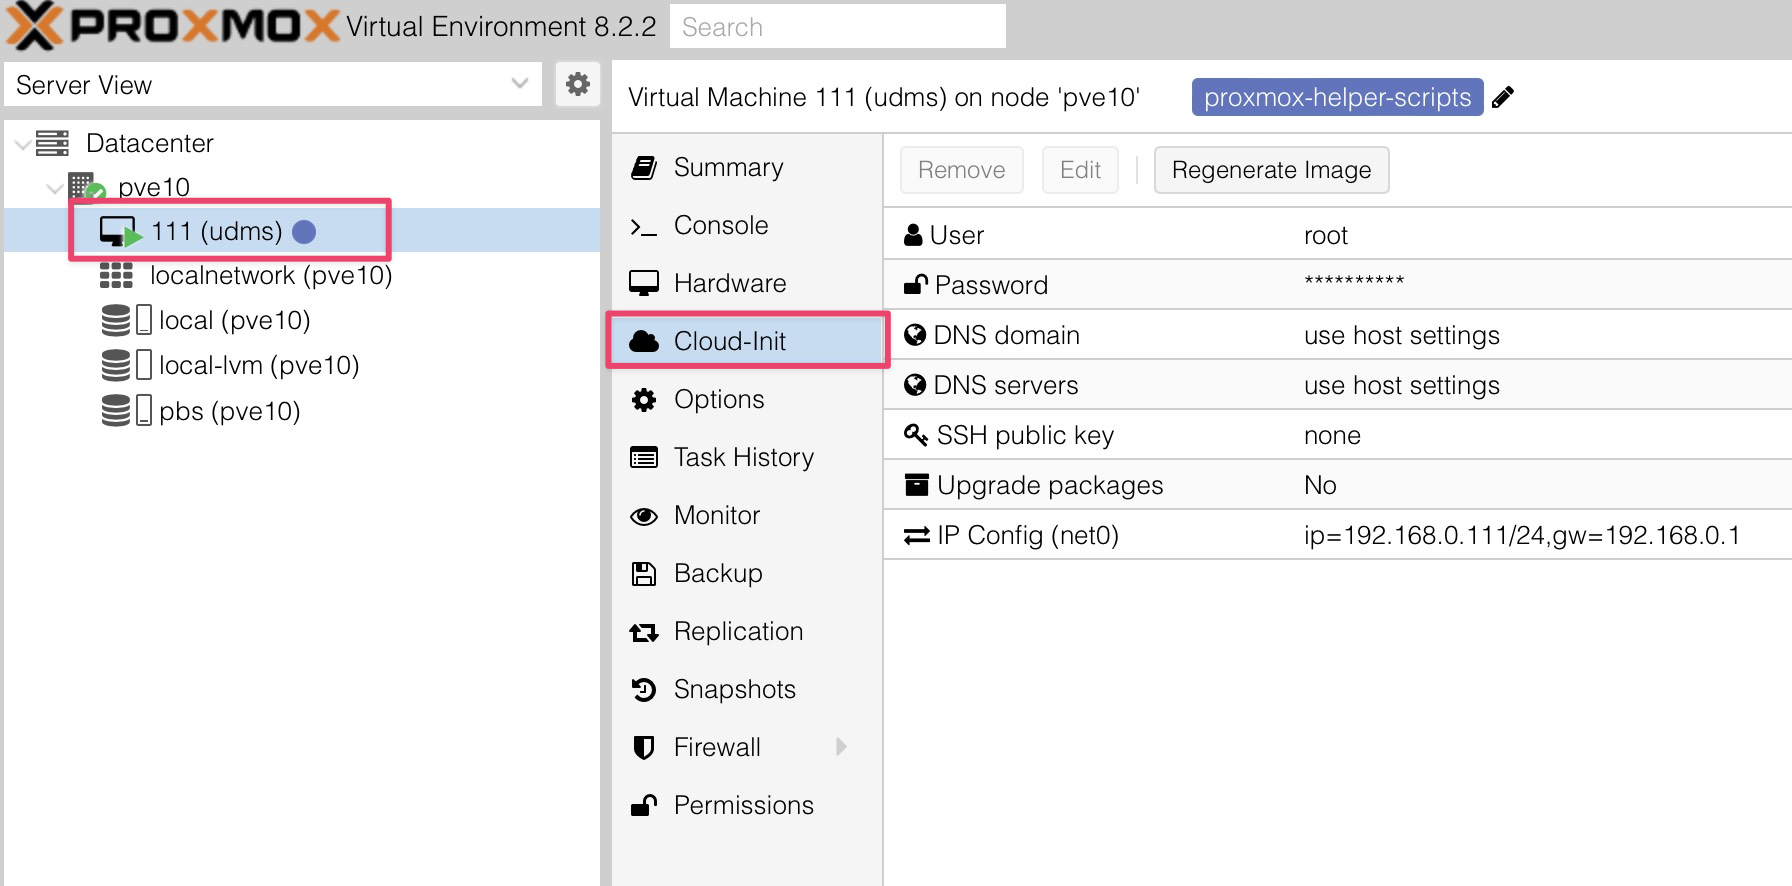
Fill in the Cloud-Init settings
- Set user to
root - Give root user a password
- Set to
No(not enough storage, yet) - Set network settings (IP/CIDR and gateway)
-
Click Regenerate Image
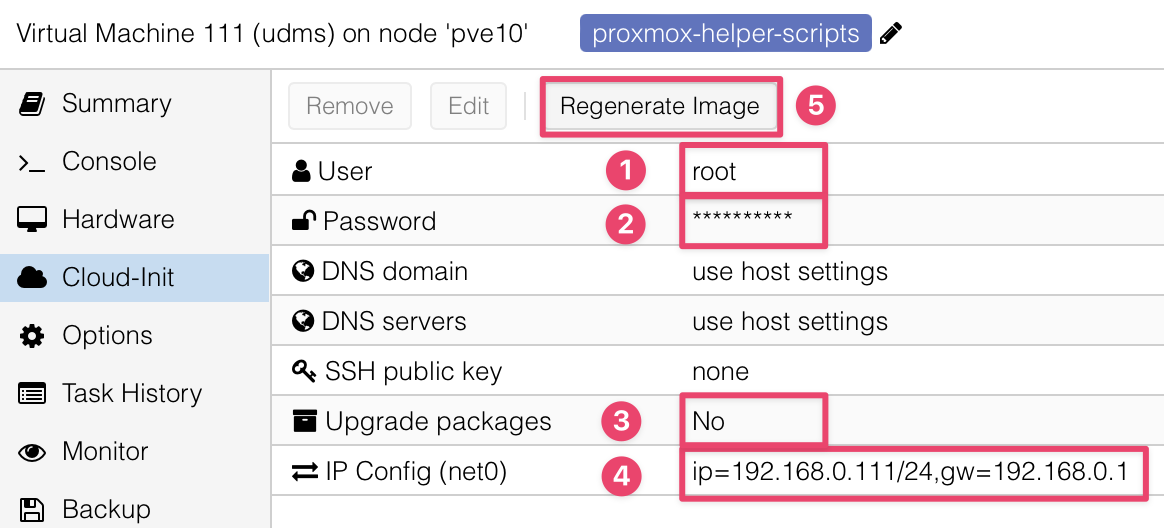
- It is now OK to click ▶ Start to start the VM!
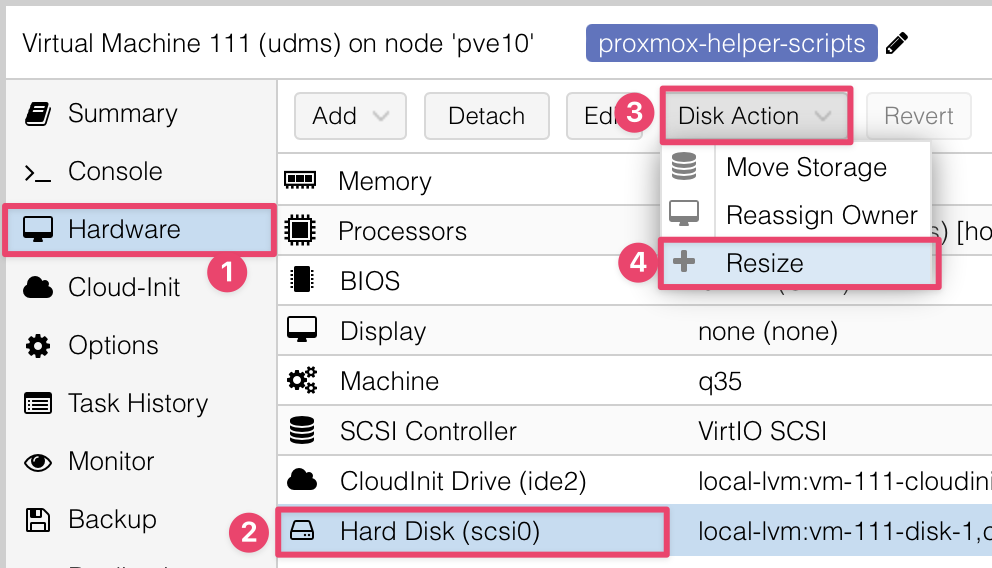
Resize the bootdisk (/dev/sda)
This resizes the boot disk but does not allocate it to the VM. We will use parted to do that later.
- Select xterm.js under the VM’s top nav bar Console pull down button for copy/paste functions
-
Open the Resize screen and enter the size increase you want
Hardware → Hard Disk (scsi0) → Disk Action → Resize
Expand the VM disk partition to use the new space
Type these steps in the xterm.js console:
-
Run parted:
parted /dev/sda -
Answer the parted prompts as they appear:
(parted)
resizepart 1Fix/Ignore?
FixPartition number?
1Yes/No?
YesEnd? [2146MB]?
-0(parted)
quit -
Then reboot:
reboot
Enable SSH
sed -i -e 's/#PermitRootLogin prohibit-password/PermitRootLogin yes/g' -e 's/^PasswordAuthentication.*/PasswordAuthentication yes/' /etc/ssh/sshd_config
rm /etc/ssh/sshd_config.d/60-cloudimg-settings.conf
systemctl restart ssh
Add QEMU Guest Agent
apt-get update && apt-get -y upgrade
apt-get install -y qemu-guest-agent
Install files required for iGPU hardware passthrough
Be sure to do this step or iGPU HW passthrough from Proxmox to your new VM will not work!
sudo apt install sudo linux-generic
reboot
Next Step: GPU Hardware Passthrough
If you have GPU Passthrough implemented on your Proxmox VE bare metal server and want to use it in this VM, follow the Proxmox GPU Passthrough: VM Setup instructions in this doc.